Tuesday, November 26, 2013

Thanksgiving place cards

 Boy, I sure had to do a lot more scissor cutting before Cricut!  I love my handy dandy machine and cartridges.  I just used random shapes and came up with these little turkeys for our Thanksgiving table place cards.  I like the idea of the favors being a treat, but I decided that there will be enough candy to eat with our bingo game, so I made the favors with the jumbo chapsticks pictured below.

Red Pepper Crackers

This is my favorite way to eat tuna!  It has been since I was a teenager.   I would cut up iceberg lettuce, spoon a big helping of tuna on top and eat it like a salad.  Now we have leaf lettuce and so I really like the Romaine lettuce boats even better than the salad!  For two cans of tuna I add 1 cup of celery, finely minced, 1 cup of hydrated lime pickles, finely minced, 3 green onions, finely chopped and about 4 tbsp. of mayo.  Mix together and spread on the lettuce leaves. Add a few tomato wedges to make it even better.  The Red Pepper Crackers are a new addition for me.  I love their buttery, peppery flavor.  The recipe is from here:
http://www.keyingredient.com/recipes/518903016/ritz-crackers/

Red Pepper Crackers
1 stick melted butter,                                     Mix everything together, bake at 300 for 15 min.
1 packet Ranch dressing mix,
¼ c. grated Parmesan,
1 tbsp. red pepper flakes
1 tsp. garlic powder
1 box ritz crackers

Monday, November 25, 2013

Thanksgiving Family Bingo

 I am so excited for Thanksgiving evening to play this game!  My old homemade thanksgiving bingo cards were outdated and falling apart so I made some new ones!  We play this "white elephant" style.  I'll explain that later...
 The categories for these cards are:  Sibling Nicknames, Favorite Meals (mom's cooking), Traditions, Favorite Youtube Videos, and Relatives.  I collaborated with the kids to get a list of 12 for each category.  Then I pulled up a table in windows and began to make the cards.  I needed to make 10.  I started by using the top 5 on the lists and then the next card I used the bottom 5 of each list and the following card I used every other one and so on.  By the time I started working on the #7-10 cards I was just looking to see which things on the list hadn't been used as often and really randomized the cards.  Mike said I could use some spreadsheet thingamajig and write a randomizer program for the computer.  I stared at him with a blank face for a  minute and said, "Yeah, okayyy...???"  and then proceeded with my table and very non-high tech method. 
 Sorry for the glare!  The containers on the left have the category titles.  Each of the items in the categories was printed off, cut apart, folded and all together placed into another container for drawing out during the game.  After each slip is read it will go into the labeled container.  Then when someone calls, "bingo!" we can go back through each category to double check.  I bought the colored stones that have a flat bottom at the dollar store to use as the markers.
 Round 2:  Yes, I know they are backwards, sorry!  This round is if we have so much fun that everyone wants to play again.  This game can take well over and hour to play so I like to start with the big stuff first just in case we decide to play only once.  Round 2 is the Ultimate Supreme Round.  Skip down to the next picture and I'll explain.
This is the prize basket for Round 1, aka the Ultimate Grand Supreme Round.  These are the big candy prizes.  Okay, I said we play this "white elephant" style.  Here's what that means:  The first bingo winner takes a bag of candy from the basket.  The second winner has a choice.  Take from the first player his candy or take from the basket.  If he/she takes #1's candy, then #1 takes from the basket.  #3 can take from #2, #1 or the basket.  If he/she does, then that player can take from another winner or the basket and so on until everyone that has won so far has a bag of candy.  Each bag can only be taken ONCE per round.  After it has been taken once in a round, it stays with that person until the winner of the next round decides what to do.  This is a little tricky with kids...and let's face it, some adults!  I stocked the basket with candy that is all approximately the same size and there are 14 bags, even though only 10 people will be playing so hopefully there will be lots of kinds everyone will want!  My family is VERY competetive though and like sharks, they smell blood in the water!  If someone really has their heart set on a particular kind, the other kids all end up wanting that kind and sometimes we have to stop the games to dry the tears and remind everyone how much fun we are having! lol!  After a little pep talk we can usually resume game playing.  This goes for almost any game.  This bingo really is fun and I laminated this set so we can use it for many years to come.  There is still time for you to make one!  :)

White Chocolate Cheesecake Shooters

 I had one more container of raspberries to use in my refrigerator and this dessert is what I came up with to use them for.  These little shot glasses are the perfect, guilt-free amount of this incredibly rich dessert.  I wouldn't classify it as "easy" just because of the sink full of dishes the making of it created, but it was certainly not difficult!

White Chocolate Cheesecake Shooters  (makes 12)
Crust:
5 graham crackers (the big ones)
2 Tbsp. melted butter
1 Tbsp. sugar
Raspberry Filling:
1 -12 ounce container raspberries
1 cup sugar
1/2 cup water
White Chocolate Cheesecake:
1 envelope unflavored gelatin
2/3 cup water
1 -8 ounce brick of cream cheese, softened
35 white chocolate (vanilla) melting drops (4 ounces)
1 tsp vanilla
1 can (14 ounces) sweetened condensed milk
1 cup (1/2 pint) heavy whipping cream
        Raspberry filling:
In a saucepan combine the raspberries, 1 cup sugar and 1/2 cup water.  Bring to a boil over medium heat.  Turn to low and simmer for 25 minutes.  Remove from heat and let cool completely.
        Crust:
In a ziploc bag crush the graham crackers very finely with a rolling pin.  Add the melted 2 Tbsp. butter and 1 Tbsp. sugar and mix well.  Spoon 3 tsp. into each shot glass and press down firmly. (I used an ice cream scoop handle that was the same size as the bottom of my glasses.)
        White Chocolate Cheesecake:
In a small saucepan srpinkle the unflavored gelatin.  Pour the 2/3 cup water over the top and let it sit for 1 minute.  Place the pan over low heat and stir it until the gelatin completely dissolves.  Remove from heat.  In a double boiler melt the white chocolate drops over low heat, stirring constantly.  Remove from heat.  In a small mixing bowl beat the whipping cream on high speed until fluffy and soft peaks form, then set aside.  In a large mixing bowl add the cream cheese and melted chocolate drops.  Blend with a mixer until fluffy.  Add the vanilla and gelatin water and mix.  Slowly pour the sweetened condensed milk in while beating on slow to medium speed.    Gently fold in the whipped cream.  Pour the mixture into a gallon sized ziploc bag, cut the corner and squeeze the mixture into the shot glasses on top of the crust until halfway up the glass.  Add about an inch of the cooled raspberry filling.  Fill the rest of the glass up with the cheesecake mixture.  Top with a fresh raspberry and refrigerate at least 3 hours.  This will make 16 shot glass desserts.


Saturday, November 23, 2013

Ham and Eggs

Okay, the last of the ham!  Lucky me!  There was only enough for this one dish of scrambled eggs.  I'm sure nobody needs a recipe for eggs, so I'll just tell you some of my favorite ingredients in these eggs or omelets.  In these eggs I used the leftover ham, some yellow onions sauteed with mushrooms, some green onions and roma tomatoes, which give the dish a freshness, and some cheddar cheese.  I also mix 1 Tbsp. of heavy cream into my 2 eggs before scrambling them.  Now I have shared 3 of my family's favorite leftover recipes for our crockpot ham.  I hope you found something new to try!

Friday, November 22, 2013

Advent Calendar Luke: 2 Story

 This is just to give you an idea for a countdown to Christmas using the scriptures.  I made this about 10 years ago and I wish I had a pattern for you, but I drew all these freehand.  I am no artist, so if I can do this, so can you.  Use the following photos as a guide.  Each round "stone" is the stopping place for the traveling Mary and Joseph and donkey.  You can't see it, but somewhere on each black number is a little bit of velco backing.  On the back of the donkey is the velcro. 
 Each round "stone" is glued on the bottom and and around the sides only.  The top is left open to make it a pocket.  Inside each pocket is a verse from Luke:2 of the Christmas story.  It is very faint but if you look closely you can see a slip of paper sticking out of the number 1 pocket.
 The shepherd and sheep and palm tree.  Very easy! 
 The stable, manger and star.
 The three wisemen and their gifts.
The mountains and a well.  Merry Christmas!

Ham and Potato Casserole

 I just love a simple, comforting casserole.  This one is really good!  I use leftover ham to make it.  I also love fresh mushrooms, but they could easily be left out of this if you're not a fan.

Ham and Potato Casserole
1 medium yellow onion, diced
7-8 small Cremini (button) mushrooms, quartered
2 Tbsp. butter
6 medium Russet potatoes, diced (I leave the skin on)
2 large carrots, quartered and sliced
3 cups ham, shredded or diced
2 1/2 tsp. flour
1 cup milk
1 can cream of mushroom soup
French fried onions
      In a frying pan or skillet melt the butter and saute the onions and mushrooms until golden brown.  Remove from pan and set aside.  In the frying pan add flour, mlik and soup.  Simmer over medium heat until it boils and thickens, approximately 4-5 minutes.  Remove from heat.  Cut up the potatoes, carrot and ham.  Combine the potatoes, carrots, ham, mushrooms, and onions in a 9x13 pan.  Pour the soup mixture over the top and bake uncovered at 350 degrees for 1 hour.  Sprinkle the french fried onions over the top and bake an additional 5 minutes until onions crisp.


Thursday, November 21, 2013

Hawaiian Haystacks

When ever I cook a ham this is the number one request for leftovers.  The salt versus sweet contrast make this dish really interesting!

Hawaiian Haystacks
3 cups of cooked rice
1 pkg. Chinese chow mein noodles (the above are a smaller rice noodle version)
2 cups of cooked ham, shredded
4-5 packets chicken gravy, prepared according to pkg. directions
2 cups celery, diced
1 can pineapple tidbits, drained
1 cup coconut, shredded and sweetened
5-6 green onions, chopped
maraschino cherries

Layer everything in the order listed above on plates and enjoy!


Wednesday, November 20, 2013

Crockpot Ham


I like my ham the same way I like my pot roast, tender and juicy!  I also prefer my ham to be sweetened up a little instead of super salty.  I usually use a picnic or a shank roast, whichever is the lower price per pound at the time.  I like to buy a couple when they are on sale and stick them in the deep freezer.  These cuts usually have the bone in them and a little more fat and skin on them, but that's okay!  We will take care of that.  I place my ham in the crockpot and I usually have to cut a few pieces off the top and cram them in somewhere because these hams are just a little too big to fit in whole.  Next I sprinkle on 2 cups of brown sugar, yes 2 cups, it sound like a lot, but you aren't going to drink the leftover liquid and it helps to counter the saltiness.  Then I pour about half of a 2 liter of cream soda or sprite over the top until it fills the crockpot to 2/3 full.  Cover and cook on high for 9-10 hours.  It takes longer to cook than a beef roast so I put it in the crockpot before I go to bed and in the morning when it is finished I remove it from the crockpot, cut off any fat or skin and refrigerate it until dinnertime.  I strain the liquid and reserve a couple of cups with the ham to reheat it in later.  At dinnertime I place the cooked ham and liquid in a pot and over low heat bring it back up to a serving temperature.  It is so soft and tender and juicy!  I will be sharing recipes all week using this tasty ham.

Funeral Potatoes

I know it sounds like a weird name and in other parts of the country a recipe similar to this might be called, "Cheesy Potato Casserole" or something like that, but here in Utah they are Funeral Potatoes.  The above picture shows part of a standard meal provided as a service to families, after the funeral of a loved one, by the Relief Society.  They are crazy high in fat content but equally high in flavor and comfort value.

Funeral Potatoes
1-32 ounce bag of frozen, shredded hash brown potatoes. (I use just a tad less for more creamy!)
1 medium yellow onion, diced
1 stick butter. melted
2 cups sour cream
2 cans cream of chicken soup
8 ounces of shredded medium cheddar cheese
     Preheat the oven to 350 degrees.  Combine all the ingredients together and bake in a 9x13 pan for 30-40 minutes until bubbly and hot.

Tuesday, November 19, 2013

Strawberry Chicken Salad


The poppy seed dressing on this salad is a recipe that I use for a couple of different dishes.  It is so easy to make and there isn't a bottled dressing that can match it for flavor and freshness. 

This is a layered salad that is best assembled onto each individual plate.  This is how I serve it, in bowls like this and then everyone can make their own salad on their plate. This is the order I use:

Romaine lettuce, chopped
baby spinach leaves
Chinese chow mein noodles
sliced strawberries
grilled chicken breast, cut into strips (a rotisserie chicken would work too!)
bacon, cooked and crumbled
toasted, sugared almond slices
green onions
poppyseed dressing

    Toasted Almonds:  I use a frying pan over low-medium heat.  Add 1 cup of sliced raw almonds and 1/2 cup sugar.  Stir continuously until the sugar begins to melt and carmelizes over the almonds and the almonds turn a golden brown.  Remove from heat and continue to stir for 1-2 minutes.
    Poppyseed Dressing:
1 cup mayo
2 Tbsp. sugar
2 tsp. poppyseeds
juice of 2 limes
   Combine ingredients and stir.  Add additional sugar if too tart or a tsp. of milk if too thick.


Monday, November 18, 2013

Macaroni and Cheese

No blue boxes here!  This is the real deal.  I added a little more milk than the original recipe called for, but I used a Paula Deen recipe...uh oh...I know! So how many calories are there per serving?  I'm not going to look!  I don't want to take the chance of ruining my appetite for it by knowing how high the count is!  :) 

Macaroni and Cheese
2 cups uncooked macaroni (I used the long variety)
4 Tbsp. of butter
2 1/2 cups grated cheddar cheese, medium
1/2 cup sour cream
1 can, 10 2/4 oz., condensed cheddar cheese soup (Campbell's)
1 1/2 cups whole milk
1/2 tsp. salt
1/2 tsp. pepper
1/2 tsp. ground mustard powder
   In a pot of boiling water cook the macaroni according to al dente directions.  (I like my pasta a little on the firmer side, not soggy or squishy.)  Drain and set aside.  In a medium to large pot melt the butter and the grated cheese togther over low heat, stirring constantly.  Add the sour cream, soup, milk, salt, pepper and mustard.  Stir together over low to medium heat until the sauce mixture is just starting to get bubbly and is hot.  Add the macaroni and stir in gently.  Cook for about 2-3 minutes over low heat.  That's it!
cups uncooked elbow macaroni
tablespoons butter
2 1/2 cups grated sharp cheddar cheese
1/2 cup sour cream
1 (10 3/4 ounce) can condensed cheddar cheese soup
1/2 teaspoon salt
cup whole milk
1/2 teaspoon dry mustard
1/2 teaspoon black pepper - See more at: http://www.repeatcrafterme.com/2012/01/crock-pot-mac-and-cheese.html#sthash.ggs58s1a.dpuf

Saturday, November 16, 2013

Studying the General Conference Ensign

 I love, love, love General Conference!  While watching the sessions on Saturday and Sunday I take lots of notes about the topics and feelings I have about what is being said.  Then the following month when I get my General Conference edition I love to read the talks and see the things I wrote in my notes.  I am sometimes surprised that what really touched me and what I heard as the main message of a speaker is just a small part of their talk.  I hear what I need to hear.  Then I learn even more by reading the messages.  In this post I am going to show you a way of studying that is helpful to me.  I realize this may not work for everyone.  My hope is to inspire you to study, whatever way works best for you!  I am a very visual learner.  I am also able to see through written "layers".  I define the layers as being colors, shapes, drawings and sticky notes.  I am able to focus on each "layer" individually as well as together.  I'll explain with a visual for each one.


This is a legend for my markings.  I taped it on the Table of Contents page. It's a litte hard to read in the picture, but each one is explained with a picture below so just keep scrolling!.


 The first thing I did with each talk was to take a red pen and put a bubble cloud around all of the sentences or phrases that were in my notes.  These are the things that I wrote while watching conference.  I love to look through the talks and see these red outlines!  It reminds me of the feelings I had and how the Holy Ghost touched me at that time to inspire me to take that note.


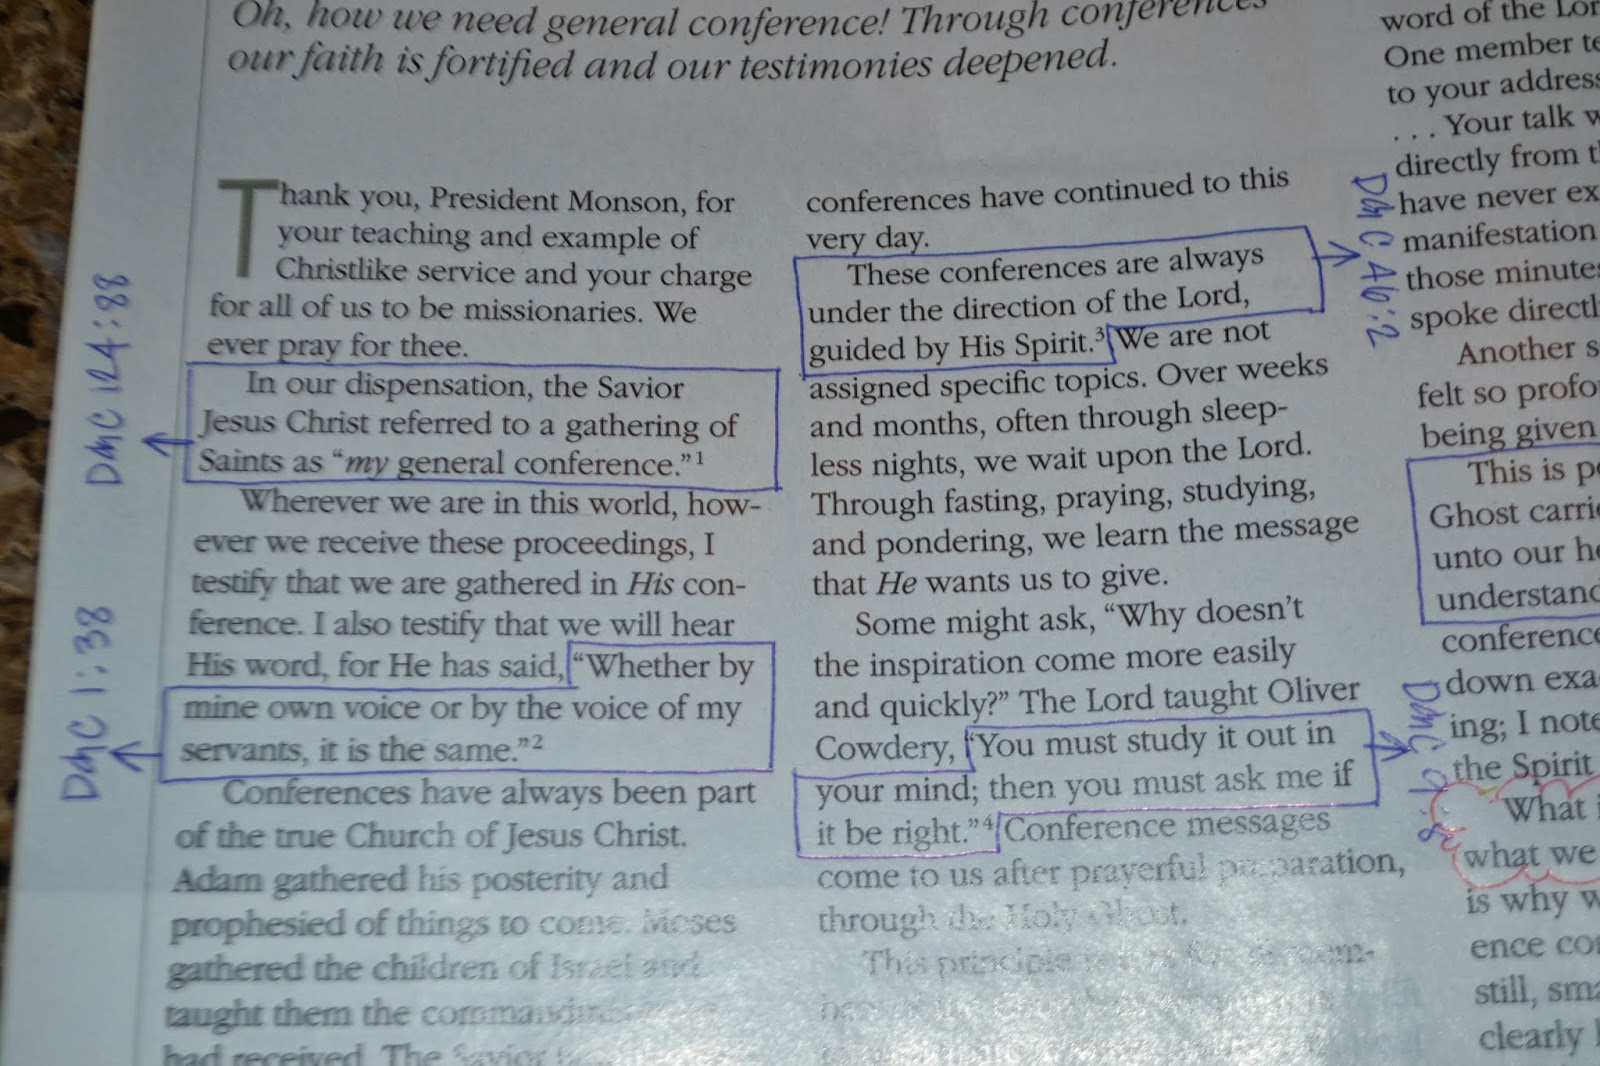
 Next, with a blue pen I put a box around each of the scriptures referenced in the talk.  At the end of each talk is a footnote resource list.  This tells me where each scripture is located so I can write it down in the margins next to the blue box.  Some of the talks actually have the scripture references written after each quote.  I did the same blue boxes for those talks, I just didn't write the reference again in the margin.  This helps me to study the scriptures more in connection with the talk's message.  It was fascinating for me to see in Elder Bednar's talk that 75% of his talk was scripture!


 After marking the scripture locations, I use a yellow highlighter and as I read and re-read the talk I highlight the parts that really stand out to me.  When I am finished, if you were to go back and read just the highlighted parts, you would have a good idea what the talk was about.  A lot of these highlighted paragraphs are things I want to study more in depth or are things I really want to remember.


  This page has one of my awkward sketches. (I am no artist, lol!) The story in this part of the talk reminded me of a Relief Society lesson that I taught.  I drew a small version of the picture that I had in my R.S. manual and it's reference on the last page of the talk next to the picture of the young boy to remind me where the full lesson was located.  I thought it would be a good FHE lesson, especailly for my daughters.  We are going to base our next 6 months of FHE around these conference talks so this one is already coming together!


I use the sticky notes towrite my feelings or thoughts to add to the talk pages.  This is a part of the visual layering I mentioned.  If I write too much on the pages in the margins, it overwhelms my eyes and gets lost.  By having things written on these notes, I am able see them when I choose to, but not be distracted by them when I am studying.  I also like to use different colors and papers for different parts.  More layering.  Am I making any sense?


  For small notes or specific references, I did occasionally mark them in the margins instead of on a sticky note.  I used a black pen to differentiate the note from the blue scriptural references.


 Here I went onto Pinterest and found several pins from several people of conference "memes".  (I'm sorry I didn't keep a list of who and where I found them!)  I printed some of the fun ones postage stamp sized and stapled them onto the pages where the quotes are found to create these fun little colorful tabs.  I did this purely for esthetics.  They add no real study value, except visually, to me!


 Choose a talk to study.  Mark it up as an example.  Add a few pens and sticky notes for additional talks and this is a great visiting teaching gift!   I hope something in this inspires you to study the General Conference Ensign.  The messages are powerful and full of gospel truths we desparately need in our lives and are for us today!  Remember:  Today's prophet's words = today's scripture!


Raspberry Shortbread Bars


Fresh raspberries and shortbread?  Yes, please!  Here's a great recipe for those who don't always want their cookies to be super sugary and sweet. I slightly adapted the recipe from here:  http://coleensrecipes.blogspot.ca/2011/10/rasberry-shortbread-bars.html

Raspberry Shortbread Bars
raspberry filling:
12 ounce container of fresh raspberries
1/2 cup water
1 cup sugar
Combine the water and sugar and raspberries in a small saucepan.  Bring to a boil over high heat, stirring constantly. When it begins to boil turn the heat down to medium and simmer for 20 minutes, stirring occasionally.  The berries will break down as they cook and it will begin to resemble a jam as it cools.


Next make the shortbread crust and topping:
2 1/2 sticks of butter, melted and then cooled to room temp.
¾ cup of white sugar
2 large egg yolks
3 cups + 3 tablespoons all purpose flour
In a large mixing bowl combine the butter and sugar.  Next add the egg yolks and wisk them in.  Add the flour and stir with a wooden spoon until the dough is mixed.  It will be a little flaky, yet stiff.  It does not need to be a solid mass of dough.  When you push it into the pan, the flakiness will disappear.  This is typical with a shortbread.  Remove 2 cups of dough and set aside.  Line a 9x13 baking pan with foil.  Make sure the foil comes up a couple of inches on the ends.  This will help you lift the whole pan of bars out for easier and straighter cutting.  There is enough butter in this recipe to prevent sticking to the bottom, however I recommend spraying the sides so the jam doesn't stick.  Press the remaining shortbread dough evenly and firmly into the pan.  Prick the dough with a fork and put the pan in the refrigerator to chill for 30 minutes.  After chilling, bake at 325 degrees for 20 minutes.  Do not overbake!  You do not want a brown crust.        ( The picture below was taken before it was baked!) 

 
After the shortbread has baked, remove it from the oven and immediately pour the cooled raspberry jam over the top and spread it evenly.  
 

Add 1/4 cup sugar to the 2 cups of reserved dough and use a pastry blender to mix it in and break up any clumps.  This is the topping.  Sprinkle onto the raspberry layer and bake at 350 degrees for 30 minutes.  Remove the pan from the oven after baking and let it cool on the countertop for approx. 20-30 minutes, then refrigerate the pan.  After about an hour you can take the pan out and holding onto the foil sides, lift the recipe from the pan.  Place it on a cutting board and using a sharp knife, cut the bars into the size you want.  The bars will return to room temperature in about 30 minutes. 


Friday, November 15, 2013

Sweet and Sour Chicken

This is an easy recipe!  It is fast and simple because I use precooked and frozen popcorn chicken instead of breading and cooking myself (which I have done in the past!).  I buy the Wal-Mart Great Value Brand popcorn chicken because it is real pieces of chicken breast.  I don't eat meat that has been "formed" into any kind of a shape, like "nuggets".  Yuck!   Does that make me a food snob, or just picky?  I don't even want to think about what goes into those "nuggets".  Anyway...the homemade sweet and sour sauce on top is delicious!

Sweet and Sour Chicken
1 bag of popcorn chicken
1 green bell pepper, diced
1 can pineapple chunks, juice drained and reserved for the sauce
1 Tbsp. vegetable oil
4-5 cups cooked rice
sweet and sour sauce
  Bake the chicken in the oven following the package directions.  Set aside.  Saute the bell pepper in the oil. Add the pineapple to heat it through.  Pour the sauce into the pan with the bell pepper and pineapple.  I like to pour the sauce over each individual serving of rice and chicken.  The battered coating on the chicken will soften quickly so I keep the sauce separated for better leftovers.  (Haha!  like we even have any!)

Sweet and Sour Sauce
1 cup pineapple juice
1 cup sugar
1 tsp. salt
2 tsp. cornstarch
1/2 cup ketchup
4 Tbsp. oil
   In a small bowl, add the pineapple juice, sugar, salt, and cornstarch and stir together.  Set aside.  In a saucepan add the ketchup and oil and wisk together to combine.  Bring to a boil over medium to high heat, stirring constantly.  Add the pineapple juice mixture and wisk into the ketchup.  Stir until it comes to a boil and thickens.

Thursday, November 14, 2013

Easy Biscuits

Easy Biscuits
4 cups flour
2 Tbsp baking powder
1 tsp salt
1 cup shortening (I like Butter Flavored Crisco)
1 1/2 to 2 cups milk
    In a large mixing bowl combine the flour, baking powder and salt.  Using a pastry blender or two knives, cut in the shortening until small pea sized pieces are mixed in.  Add the milk a little at a time and use a wooden spoon to mix it together.  Stir until just combined and dough is a little sticky, but holding together.  Do not overmix the dough!  Roll it out on a lightly floured surface with a rolling pin to one inch thick and cut the circles.  You can use a cookie cutter, a canning lid, or any other item that will make the circle the size you want.  I go old school and use a drinking glass, the way my grandma always used to!  Bake on a lightly sprayed cookie sheet at 450 degrees for 8-12 minutes.

Wednesday, November 13, 2013

Citrus Salad (Grapefruit)


My Grandma Betty lived in Arizona and had several citrus trees in her backyard.  I loved to pick and eat the fruit when I visited her.  She made all sorts of popsicles and juices from them.  I always loved the way her grapefruit tasted so sweet and not at all sour.  She told me her secrets....  she said the bitterness in the grapefruit comes from the skin, so don't eat it!  Not the peel, the skin surrounding each section.  (There are actually a few people who eat the peel, blech!)  She said to find a juicy ripe orange, cut it in half, and squeeze all of the juice onto the grapefruit.  The way my Grandma ate it was to cut the grapefruit in half, squeeze the orange into it and then she used her spoon and carved out each half section and ate it one at a time.  I prefer to do the work all up front and then eat it, so I peel the grapefruit, separate the sections and tehn using a paring knife carfeully cut away and peel off the skins.  I also peeled and sliced some clementines to go with it.  The pomegranate was a nice addition too!

Tuesday, November 12, 2013

Perfect Pot Roast


There are a couple of things I have learned over the years about making the perfect stracatta (falling apart) pot roast.  The first is that the cut of beef really does make a difference.  I prefer to use a chuck roast.  The marbeling throughout the meat is really important and this cut has always done well for me.  Another critical factor is the browning before cooking.  You must brown all of the sides of the roast until you get a nice crust all around.  This process keeps the meat juices inside the roast as long as possible.  I have skipped this step before and been a little diappointed with the finished roast, it just wasn't as tender!  I use about 3-4 Tbsp. of olive oil in a hot pan and sear it on high heat for about 3-4 minutes per side all the way around.  The next is to line the bottom of the crockpot with your potatoes and carrot and onions and then set the roast on top of the vegetables and fill in around the sides of the crockpot with vegetables.  Don't let the roast come in contact with the crockpot at all!  Next I pour in one can of beef broth and then sprinkle 3-4 Tbsp. of McCormick's Montreal Steak seasoning over everything.  Cover and cook on high.  I typically cook a 5 lb. roast for about 8-9 hours.  It has to cook approximately one hour past what most people consider "done" in order for the sinew and marbled fat to break down.  This breakdown is what makes the meat go from what you thought was kind of dry to a perfect, soft, tender, juiciness.  It is a little scary for some people to try this, but trust me: The next time you cook a roast and you check it thinking it is done, if it is not this moist and succulent looking, let it go longer!  A little brown gravy... some homemade bicuits and jam...a nice green salad...and you will have a perfect Sunday dinner.